x402 Developer's Guide: Building Payment-Enabled APIs
A hands-on guide to integrating the x402 payment protocol into your applications. Learn middleware setup, payment lifecycle, testing with x402-fetch, and production deployment.
This guide walks you through integrating x402 into your applications. By the end, you’ll have a working paid API endpoint and understand the complete payment lifecycle.
Prerequisites
Before starting, you’ll need:
- Node.js 18+ installed
- A wallet address to receive payments (any EVM wallet works)
- Test USDC on Base Sepolia - get it free at faucet.circle.com
Understanding the Architecture
x402 involves three parties:
| Party | Role |
|---|---|
| Client | Browser, curl, AI agent, or any HTTP client making requests |
| Resource Server | Your API server running x402 middleware |
| Facilitator | Service that verifies and settles payments on-chain |
The middleware handles all the complexity: building payment requirements, communicating with the facilitator, and verifying payments.
What the Middleware Does
The x402 middleware handles three key responsibilities:
1. Building the Paywall Response
When a request arrives without payment, the middleware checks the Accept header:
- Browser requests (
Accept: text/html) → Returns an interactive payment page with wallet connection - Programmatic requests (curl, fetch, AI agents) → Returns JSON payment requirements

2. Managing the Payment Lifecycle
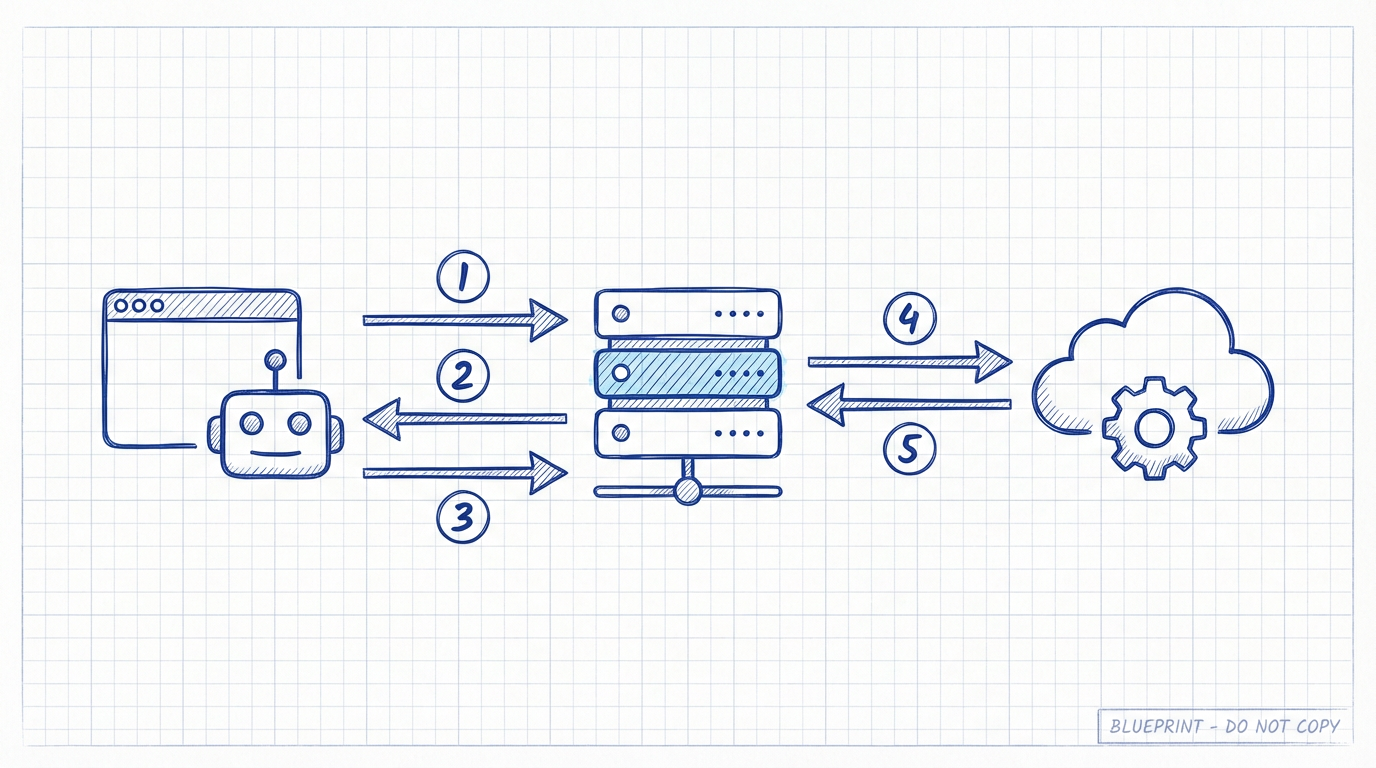
This is the most important concept to understand. Here’s exactly what happens when a paid request arrives:

Step-by-step flow:
- Client sends request with
X-PAYMENTheader containing signed payment authorization - Middleware extracts the payment payload from the header
- Middleware calls
/verifyon the facilitator to validate:- Is the signature valid?
- Does the payer have sufficient USDC balance?
- Is the amount correct?
- Facilitator returns
{ isValid: true, payer: "0x..." } - Middleware serves your content - returns 200 OK with your response
- Middleware calls
/settleasynchronously in the background to execute the on-chain transfer
Request → Extract Payment → Verify → Serve Content → Settle (async)The key insight: content is served after verify but before settle. This optimizes for speed - users get instant responses without waiting for blockchain confirmation.
3. Communicating with the Facilitator
The middleware abstracts away all facilitator communication. Under the hood, it makes two API calls:
| Endpoint | Purpose | When Called |
|---|---|---|
POST /verify | Validate payment signature and balance | Before serving content |
POST /settle | Execute on-chain USDC transfer | After serving content (async) |
Risk Warning

Because settlement happens after serving content, there’s a time window where things can go wrong:
The Risk: Between verify and settle, the payer could transfer their USDC away, causing settlement to fail. You’ve already served the content but won’t receive payment.
Risk Assessment:
- Small amounts ($0.001 - $1): Risk is generally acceptable. The middleware’s default behavior works well.
- Larger amounts ($10+): Consider implementing custom logic to settle before serving content.
Mitigation Options:
- Accept the risk for micropayments (most common approach)
- Implement settle-first logic yourself (see “Advanced: Without a Facilitator”)
- Use escrow patterns for high-value transactions
Quick Start: Express Example
Let’s build a paid API endpoint.
Installation
npm install express x402-expressBasic Server
import express from "express";
import { paymentMiddleware } from "x402-express";

const app = express();

// Your wallet address to receive payments
const WALLET_ADDRESS = "0xYourWalletAddress";

// Configure paid routes
app.use(
  paymentMiddleware(
    WALLET_ADDRESS,
    {
      "GET /api/premium": {
        price: "$0.001",           // Price in USD
        network: "base-sepolia",   // Blockchain network
        config: {
          description: "Access premium data",
        },
      },
    }
  )
);

// Your protected endpoint
app.get("/api/premium", (req, res) => {
  res.json({
    message: "Welcome to premium content!",
    data: { secret: "This cost $0.001 to access" },
  });
});

app.listen(4021, () => {
  console.log("Server running on http://localhost:4021");
});
That’s it! The middleware automatically:
- Returns 402 + payment requirements for unpaid requests
- Shows a payment page for browser visitors
- Verifies and settles payments
- Allows access after successful payment
Other Frameworks
The usage pattern is similar across frameworks. Refer to the npm documentation:
| Framework | Package | Documentation |
|---|---|---|
| Express | x402-express | npm |
| Hono | x402-hono | npm |
| Fastify | x402-fastify | npm |
| Next.js | x402-next | npm |
Supported Networks
The x402 protocol supports these networks:
EVM Networks
| Network | ID | Type | Notes |
|---|---|---|---|
| Base | base | Mainnet | Recommended for low fees |
| Base Sepolia | base-sepolia | Testnet | Use for development |
| Polygon | polygon | Mainnet | |
| Avalanche | avalanche | Mainnet | |
| Avalanche Fuji | avalanche-fuji | Testnet | |
| IoTeX | iotex | Mainnet |
Solana Networks
| Network | ID | Type |
|---|---|---|
| Solana | solana | Mainnet |
| Solana Devnet | solana-devnet | Testnet |
Facilitator Configuration
Testing Environment
For development and testing, use the public facilitator at x402.org. This is already configured by default in the middleware - no additional setup needed.
// No facilitator config needed for testing!
app.use(
  paymentMiddleware(
    WALLET_ADDRESS,
    {
      "GET /api/test": {
        price: "$0.001",
        network: "base-sepolia",  // Works with x402.org facilitator
      },
    }
  )
);
The x402.org facilitator supports:
base-sepoliasolana-devnet
Production Environment
For mainnet deployment, you need the Coinbase facilitator which requires:
- A Coinbase Developer Platform (CDP) account
- CDP API Keys (Key ID and Secret)
import { paymentMiddleware } from "x402-express";
import { facilitator } from "@coinbase/x402";

// Set environment variables:
// CDP_API_KEY_ID=your-key-id
// CDP_API_KEY_SECRET=your-key-secret

app.use(
  paymentMiddleware(
    WALLET_ADDRESS,
    {
      "GET /api/premium": {
        price: "$0.10",
        network: "base",  // Mainnet
      },
    },
    facilitator  // Use Coinbase's production facilitator
  )
);
Install the Coinbase facilitator package:
npm install @coinbase/x402Testing Your Implementation
Using x402-fetch
The x402-fetch package wraps the native fetch API to automatically handle 402 responses.
npm install x402-fetch viemCreate a test script:
import { createWalletClient, http } from "viem";
import { privateKeyToAccount } from "viem/accounts";
import { wrapFetchWithPayment } from "x402-fetch";
import { baseSepolia } from "viem/chains";

// Use a test wallet private key (NEVER use mainnet keys in code!)
const TEST_PRIVATE_KEY = "0xYourTestPrivateKey";

const account = privateKeyToAccount(TEST_PRIVATE_KEY);
const client = createWalletClient({
  account,
  transport: http(),
  chain: baseSepolia,
});

// Wrap fetch with payment handling
const fetchWithPay = wrapFetchWithPayment(fetch, client);

// Make a request to your paid endpoint
async function test() {
  const response = await fetchWithPay("http://localhost:4021/api/premium");
  const data = await response.json();
  console.log("Response:", data);
}

test();
When you run this:
- First request gets 402 response with payment requirements
x402-fetchautomatically signs the payment- Retries the request with
X-PAYMENTheader - Returns the protected content
Browser Testing
Simply visit your endpoint in a browser:
http://localhost:4021/api/premiumYou’ll see a payment page prompting you to connect your wallet and pay.
Advanced: Payment Verification Details
The Payment Payload
When a client pays, they send an X-PAYMENT header containing a signed payload:
{
  "x402Version": 1,
  "scheme": "exact",
  "network": "base-sepolia",
  "payload": {
    "signature": "0x...",
    "authorization": {
      "from": "0xPayerAddress",
      "to": "0xYourAddress",
      "value": "1000",
      "validAfter": 0,
      "validBefore": 1234567890,
      "nonce": "0x..."
    }
  }
}
Facilitator Verify Response
{
  "isValid": true,
  "invalidReason": null,
  "payer": "0xPayerAddress"
}
Facilitator Settle Response
{
  "success": true,
  "error": null,
  "transaction": "0xTransactionHash",
  "networkId": "84532"
}
Advanced: Without a Facilitator
If you need complete control over verification and settlement (e.g., to settle before serving content), you can implement the logic yourself.
Why Skip the Facilitator?
- Settle payment before serving content (eliminate risk window)
- Custom verification rules
- Self-hosted infrastructure requirements
- Privacy concerns
Conceptual Approach
Self-Verify:
- Decode the
X-PAYMENTheader - Verify the EIP-712 signature
- Check the payer’s USDC balance on-chain
- Verify the nonce hasn’t been used
Self-Settle:
- Construct the USDC
transferWithAuthorizationtransaction - Submit to the blockchain
- Wait for confirmation
- Then serve the content
This is significantly more complex and requires deep blockchain knowledge. For most use cases, the facilitator model is recommended.
Configuration Options
Price Formats
// Simple USD string
price: "$0.10"

// Custom token (advanced)
price: {
  amount: "100000",  // In smallest units (6 decimals for USDC)
  asset: {
    address: "0xTokenContractAddress",
    decimals: 6,
    eip712: { name: "USDC", version: "2" }
  }
}
Multiple Routes
app.use(
  paymentMiddleware(
    WALLET_ADDRESS,
    {
      "GET /api/basic": {
        price: "$0.001",
        network: "base-sepolia",
      },
      "GET /api/premium": {
        price: "$0.10",
        network: "base-sepolia",
      },
      "/api/enterprise/*": {  // Wildcard matching
        price: "$1.00",
        network: "base-sepolia",
      },
    }
  )
);
Paywall Customization
app.use(
  paymentMiddleware(
    WALLET_ADDRESS,
    routes,
    facilitator,
    {
      app: "My API Service",
      appLogo: "/logo.png",
    }
  )
);
Troubleshooting
”No test USDC in my wallet”
Visit faucet.circle.com and request USDC on Base Sepolia.
”402 returned but payment fails”
- Check your wallet has sufficient USDC balance
- Ensure you’re on the correct network (Base Sepolia for testing)
- Verify the private key matches an account with funds
”Settlement failed”
This can happen if:
- The payer transferred funds between verify and settle
- Network congestion caused timeout
- The facilitator service is temporarily unavailable
For production, implement logging and retry logic for failed settlements.
”CORS errors in browser”
Add CORS headers to your Express server:
import cors from "cors";
app.use(cors());
Next Steps
- Learn the protocol: The Complete Guide to x402 Protocol
- Understand the ecosystem: x402: The Missing Piece
- Official documentation: docs.cdp.coinbase.com/x402
- GitHub repository: github.com/coinbase/x402
- x402 Whitepaper: x402.org/x402-whitepaper.pdf
x402 makes API monetization as simple as adding middleware. Start with testnet, validate your use case, then deploy to production.